Since the release of Windows 10 I have spent some time playing with the Production Preview of Powershell v5.0. The new PackageManagement module is a great addition to this version of Powershell as it allows you to install software from the Chocolatey resource. Documentation and examples is a bit scarce at the moment but I found some cmdlets have some online help files.
Here is what I’ve found so far: -
I’ll start by making sure I’m on Powershell 5.0.
|
1 |
$psversiontable |
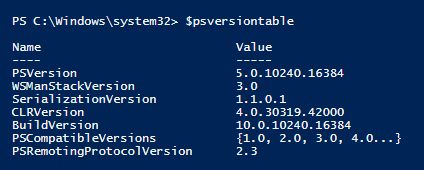
Figure 1
Let’s check what cmdlets the new PackageManagement module offers us.
|
1 |
Get-Command -Module PackageManagement |
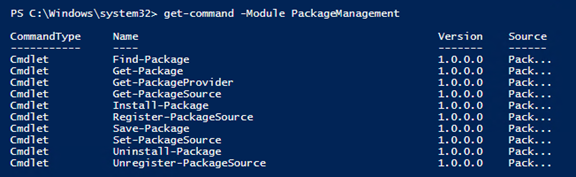
Figure 2
Get-PackageSource gets a list of package sources that are registered. Here is the online help for this cmdlet.
|
1 |
Get-PackageSource |

Figure 3
Only the PSGallery source is available. The Powershell Gallery is a great resource in itself. Making it really easy to find useful modules in a central location. That’s a topic for another day however. Here is the link if you’d like to check out what the Powershell Gallery has on offer.
The other cmdlet that interested me was the Get-PackageProvider cmdlet. The Get-PackageProvider returns a list of package providers that are connected to PackageManagement. Out of the box in the preview you get Msi, Msu, Programs and PSModule. I wasn’t entirely sure what was the difference but the About_Oneget online help file helped out here. The package provider is the package manager and the package source is the location the package provider connects too.

Figure 4
Let’s try and add Chocolatey as a package provider. The force and forcebootstrap parameters can be used interchangably according to the online help file for the Get-PackageProvider cmdlet.
|
1 |
Get-PackageProvider -Name Chocolatey -ForceBootStrap |

Figure 5
Now we have a Chocolatey package provider and if we use the Get-PackageProvider cmdlet again we can see it’s been added.
|
1 |
Get-PackageProvider |

Figure 6
When I run the Get-PackageSource cmdlet again I can also see that there is a Chocolatey package source as well.
|
1 |
Get-PackageSource |

Figure 7
In Figure 7, you can see the Location has been truncated so I can see the actual location better by piping to the Format-List cmdlet. Notice in Figure 8 the “IsTrusted : False” property. What does that mean? IsTrusted:False sounds bad. Below is an excerpt from the Chocolatey site about whether you should trust the Chocolatey package source. If you really wanted to be safe you would set up your own repository internally and then add tested software to that repository. Kind of like you would already do with SCCM or another application deployment system.
How do I know if I can trust the community feed (the packages on this site?) Until we have package moderation in place, the answer is that you can’t trust the packages here. If you require trust (e.g. most organizations require this), you should have an internal feed with vetted packages using internal resources. You should always decide whether you trust the maintainer(s) of the package, and even then you may want to inspect the package prior to installing. You can inspect packages easily with nuget package explorer or by clicking download on the package page (and then treating the nupkg as a zip archive).
From <https://chocolatey.org/about>
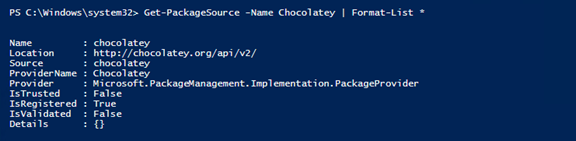
Figure 8
Now we have added the Chocolatey package provider and the Chocolatey package source, let’s see what we can do with the Find-Package cmdlet. Let’s look for Notepad++.
|
1 |
Find-Package -Name NotepadPlusPlus -Source Chocolatey |

Figure 9
Cool, it finds it. But what if you didn’t know really what Notepad++ was. Let’s see what the summary property says about Notepad++.
|
1 |
Find-Package -Name NotepadPlusPlus -Source Chocolatey | Select-Object -Name Summary | Format-Table -Wrap |

Figure 10
Because the Chocolatey package provider isn’t trusted. Let’s save the package to our local hard drive. First I have to create the location that I’d like to save the package too.
|
1 |
If(!(Test-Path -Path C:\Temp\Notepad++)){New-Item -Path C:\Temp\Notepad++ -Itemtype Directory} |

Figure 11
Now that the location has been created let’s use the Save-Package cmdlet to save it to the location. I’ll use the -IncludeDependencies parameter to make sure I get all the bits I need to install Notepad++.
|
1 |
Find-Package -Name NotepadPlusPlus -IncludeDependencies | Save-Package -Path C:\Temp\Notepad++ |

Figure 12
Let’s check what files we have in our saved location. In Figure 13 we can see that there are 2 files with .nupkg extensions. I wasn’t sure what sort of file .nupkg extension was. I’ve heard of Nuget but I’ve never really used it. Turns out you can extract the contents of a .nupkg file just like a zip file. Excellent, I know that the Production Preview of Powershell 5.0 that shipped with Windows 10 has an Expand-Archive cmdlet.
|
1 |
Get-ChildItem -Path C:\Temp\Notepad++\ |
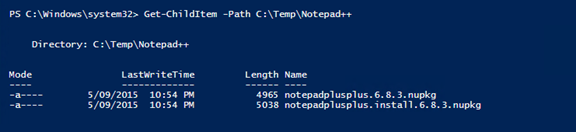
Figure 13
In Figure 14, you can see I’ve tried to use the Expand-Archive cmdlet to extract the contents of the .nupkg file but the red text tells me that only the .zip file extension is supported. Oh well, it was worth a shot. You can also see in Figure 14 the use of the PipelineVariable parameter. This is the first time I’ve used that parameter and it allows me to store the current pipeline object into the variable I’d like to use. You can read about it more over on Keith Hill’s blog.
|
1 2 |
Get-ChildItem -Path C:\Temp\Notepad++ -PipelineVariable obj | Foreach {Expand-Archive -Path $obj.FullName -DestinationPath C:\Temp\Notepad++ |
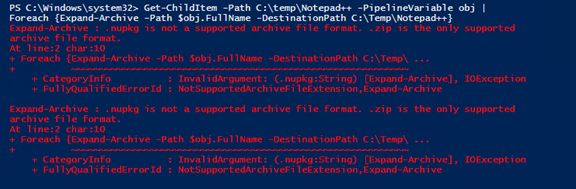
Figure 14
So, I can’t extract using the built in Expand-Archive cmdlet but I still have my trusty 7zip executable. In Figure 15 you can see an example of calling 7z.exe from within a powershell console. It works like a charm.
|
1 2 |
& 'C:\Program Files(x86)\7-zip\7z.exe' x -o'C:\Temp\Notepad++\notepadplusplus.6.8.3\' ` 'C:\Temp\Notepad++\notepadplusplus.6.8.3.nupkg' |
|
1 2 |
& 'C:\Program Files(x86)\7-zip\7z.exe' x -o'C:\Temp\Notepad++\notepadplusplus.6.8.3.install\' ` 'C:\Temp\Notepad++\Notepadplusplus.install.6.8.3.nupkg' |
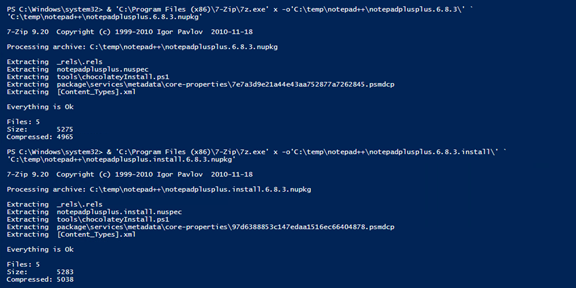
Figure 15
Now that we have extracted the contents I can see a couple of files but nothing really sticks out except the .ps1 files. I can use the Get-Content (or Cat alias) to print the contents of the file to the Powershell Console.
|
1 2 |
Get-Content -Path C:\Temp\Notepad++\NotepadPlusPlus.6.8.3\tools\chocolateyinstall.ps1 Get-Content -Path C:\Temp\Notepad++\NotepadPlusPlus.6.8.3.install\tools\chocolateyinstall.ps1 |
Figure 16
So we can see that all the ps1 file is doing is downloading the Notepad++ installer from the Notepad++ website. Sounds legit. If you were still a little bit suspect about the other files, and you didn’t have Real Time monitoring turned on, you can always scan the directory manually with Windows Defender from the Powershell Console like I have done in Figure 17.
|
1 |
& 'C:\Program Files\Windows Defender\MpCmdRun.exe' -scan -scantype 3 -file 'C:\Temp\Notepad++\' |

Figure 17
After going off into the weeds a little, I’ll now just get on with using the Install-Package cmdlet to finally install Notepad++. After playing with this module I now am excited to use these cmdlets to script installing all the software I normally use. That’s for another day however. Hope this helped.
|
1 |
Install-Package -Name NotepadPlusPlus -Source Chocolatey -Force -Verbose |

Figure 18
Image Source: https://upload.wikimedia.org/wikipedia/commons/thumb/f/f2/Chocolate.jpg/308px-Chocolate.jpg