Join Ubuntu Workstation to a Windows Domain

Here is my guide on how to Join Ubuntu Workstation to a Windows Domain using SSSD and Realmd. There are a few different methods out there on how to do this but from what I’ve tested and researched, using SSSD and Realmd is the most up to date and easiest way to achieve the desired result at the time of writing this. I’ve included links to all of the relevant documentation that I used in researching putting together this guide.

I just want to say off the bat, that I’m no Linux expert. I’ve only recently started to dabble with Linux. I wanted to see if this could be done so I tried it out in my test lab. I created this guide for myself so that I could use it again later when I no doubt forget how I originally done it in the first place. I couldn’t really find an up to date step by step guide to join Ubuntu Workstation to a Windows Domain that was easy to follow for beginners so I’m putting this up on my site in the hope that it may help someone else. If you see any glaringly obvious mistakes or if there is a better way of doing something let me know in the comments. This isn’t really Ubuntu specific as a lot of the steps from this guide have been adapted from the Redhat and Fedora documentation. If you are here following this guide, I’d say try it out in a test environment first to make sure it does everything that you need.

So in my test lab I went through and tested few different methods on how to go about joining a Ubuntu 16.04 computer to a Windows Domain. The different methods I tried were: -

  • Winbind
  • SSSD
  • RealmD & SSSD

As I said earlier, I found that for a new linux user, the RealmD & SSSD method to Join Ubuntu Workstation to a Windows Domain, was the easiest and most effective. Your mileage may vary.

I’ll split this guide up in to separate sections.

  1. Configuring the hosts file.
  2. Setting up the resolv.conf file.
  3. Setting up NTP.
  4. Installing the required packages.
  5. Configuring the Realmd.conf file.
  6. Fixing a bug with the packagekit package.
  7. Joining the Active Directory Domain.
  8. Configuring the SSSD.conf file.
  9. Locking down which Domain Users can login.
  10. Granting Sudo access.
  11. Configuring home directories.
  12. Configuring LightDM.
  13. Final Thoughts & Failures
  14. Links

1. Configuring the hosts file

To update the hosts file edit the /etc/hosts file. On my workstation, by default the fully qualified domain name wasn’t in the hosts file so I had to add it. Note: Coming from Windows I’d never seen a 127.0.1.1 address used as a loopback address. Seems legit though.

In this example the hostname of the workstation I want to join to the domain is ubutest01.

Set the 127.0.1.1 address to your new hostname in the following format.

127.0.1.1 ubutest01.bce.com ubutest01

Reboot the system for the changes to take effect.

To test if the name has been changed:

2. Setting up the resolv.conf file

Make sure you’re Ubuntu computer can talk to your DNS Servers. By default, the resolv.conf will be set like the following:

To change it to have the actual DNS servers that you are using do the following:

Comment out the dns=dnsmasq line.

#dns=dnsmasq

Then restart the network manager.

If you have set the dns servers via the GUI you should then see them in the resolv.conf file.

Check that you can resolve the SRV records for the domain by running the following:

3. Setting up NTP

It’s important to synchronize time with your Domain Controllers so Kerberos works correctly. Install NTP.

Edit the vi ntp.conf file.

Comment out the ubuntu servers and put your own dc’s in there. For example: -

server dc.bce.com iburst prefer

Restart the ntp service.

Then to check if it’s working try running:

During this process I found this little tip. This is a handy tool to make sure your syncing correctly:

Then run:

Should be syncing like a boss.

4. Installing the required packages.

Install the necessary packages:

If you are presented with the following screen, put the domain name in CAPITALS.

5. Configuring the Realmd.conf file

Make the following changes to the realmd.conf file before using realmd to join the domain. This will make domain users have their home directory in the format /home/user. By default it will be /home/domain/user. You might want it like this, I do not. If you want to read more about these options you can do that here.

Note: If you are going to have your domain users not use fully-qualified domain names, then you may run in to issues if you have a local linux user with the same account name as the active directory account name.

[active-directory]
os-name = Ubuntu Linux
os-version = 16.04

[service]
automatic-install = yes

[users]
default-home = /home/%u
default-shell = /bin/bash

[bce.com]
user-principal = yes
fully-qualified-names = no

6. Fix a bug with the Packagekit package.

There is a bug with the packagekit package in Ubuntu 16.04. You will need to do this as a workaround otherwise it will hang when you try to join the domain.

Note: I had to this when I originally wrote this guide in May of 2016. This may have been fixed by the time you are reading this. I thought I’d put it in just in case.

7. Join Ubuntu Workstation to a Windows Domain.

Now, it’s time to join the domain. Check that realm can discover the domain you will be joining.

Create the kerberos ticket that will be used the domain user that has privileges to join the domain.

Now you can join the domain using realmd.

To do a quick test to see if it’s worked:

This is all the Domain Groups that the domain user Craig belongs to. It’s worked HUZZAH!

OK, now that’s done. Lets tweak!

8. Configuring the SSSD.conf file.

I’d like to enable Dynamic DNS and some other features that I couldn’t set via the realmd.conf file. We now have the opportunity to tweak these settings in the sssd.conf file. I’ve added the following:

auth_provider = ad
chpass_provider = ad
access_provider = ad
ldap_schema = ad
dyndns_update = true
dyndsn_refresh_interval = 43200
dyndns_update_ptr = true
dyndns_ttl = 3600

You can find a full list of options to tweak at the sssd.conf man page.

9. Locking down which Domain Users can login.

Now, let’s restrict which domain users can login.

I want users specified in a specific group to be able to login, as well as the domain admins.

10. Granting Sudo Access.

Now lets grant some sudo access.

11. Configuring home directories.

Lets setup the home directory for domain users logging in.

Add to the bottom:

session required pam_mkhomedir.so skel=/etc/skel/ umask=0022

12. Configure Lightdm

The last thing I want to do is edit the lightdm conf file so that I can log in with a domain user at the login prompt.

[SeatDefaults]

allow-guest=false
greeter-show-manual-login=true

I think that’s all the tweaking I’m going to do. I’m going to reboot and see if I can login.

Once the login screen pops up you should be able to manually login. Click login.

I can log in. Huzzah!

13. Final Thoughts & Failures

This was a fun process and I learned a lot about Ubuntu and Linux in creating this guide. There were a few failures however so it wasn’t all smooth sailing.

Dynamic DNS

So after all that, I still had issues with Dynamic DNS. I researched this as much as I could but couldn’t find a resolution. I manually added the A records on my DNS server but I’d really like to get Dynamic DNS working. If anyone knows where I have gone wrong or can point out how to get this working please leave a comment.

SAMBA File Sharing

I also had some issues after this with getting SAMBA/CIFS File sharing working with Windows Authentication. I would like to be able to share a folder in Ubuntu to Windows Users and have the Windows Users authtencticate to the Ubuntu share with their Windows credentials. I’ve spent a fair bit of time trying to find a resolution to this and played a bit with ACLS in Ubuntu as well but couldn’t get it working properly. I put this down to being fairly new to Linux and not fully understanding some of the intricacies with SAMBA and Linux authentication. If anyone can point me in the right direction for getting SAMBA File Sharing working please leave me a comment.

14. Links

Below are the links that I used when researching this guide.

SSSD-AD Man Page
http://linux.die.net/man/5/sssd-ad

SSSD.Conf Man Page
http://linux.die.net/man/5/sssd.conf

SSSD-KRB5 Man Page
http://linux.die.net/man/5/sssd-krb5

SSSD-SIMPLE Man Page
http://linux.die.net/man/5/sssd-simple

PAM_SSS Module Man Page
http://linux.die.net/man/8/pam_sss

SSSD - Fedora
https://fedorahosted.org/sssd/

Redhat - Ways to Integrate Active Directory and Linux Environments
https://access.redhat.com/documentation/en-US/Red_Hat_Enterprise_Linux/7/html/Windows_Integration_Guide/introduction.html

Redhat - Using Realmd to Connect to an Active Directory Domain
https://access.redhat.com/documentation/en-US/Red_Hat_Enterprise_Linux/7/html/Windows_Integration_Guide/ch-Configuring_Authentication.html

Realm Man Page
http://manpages.ubuntu.com/manpages/trusty/man8/realm.8.html

Realmd.conf Man Page
http://manpages.ubuntu.com/manpages/trusty/man5/realmd.conf.5.html

Correcting DNS issue by editing Resolv.Conf file
http://askubuntu.com/questions/201603/should-i-edit-my-resolv-conf-file-to-fix-wrong-dns-problem
x11vnc server installation on Ubuntu 16.04 Xenial Xerus

Here is a short step by step guide for installing x11vnc server on Ubuntu 16.04 Xenial Xerus. I prefer this to Vino that comes pre-installed because Vino doesn’t play well with Windows. If you are back and forth between Linux and Windows x11vnc server works really well.

Disclaimer:
I’m a Linux n00b. I’m enjoying playing with Linux but my background is in Windows. I’m putting this up for my own benefit so I can find it later and hopefully it may benefit someone else. If there are any corrections or suggestions to make this instruction more complete, please send me some feedback in the comments section. I’ve included the links to the places from where I’ve gathered this information.

Links:
https://help.ubuntu.com/community/VNC/Servers
http://manpages.ubuntu.com/manpages/trusty/man1/x11vnc.1.html

First, install x11vnc.

Then create a password for the user to login with.

To run from the terminal you would run the following:

All of the options are listed on the man page: - http://manpages.ubuntu.com/manpages/trusty/man1/x11vnc.1.html

I’d like it to start automatically though. To do this in Ubuntu 16.04 you would do the following:

Then copy and paste the following, making sure to change the USERNAME in file path for the rfbauth parameter.

Then start the service.

Now you should be able to login via VNC from you’re favourite VNC client. On that note, I’ve found that mobaXterm is a great VNC/SSH remoting tool for joining from Windows clients to Linux clients.

Hope this helps!

Installing NixNote2 Beta 7 on Ubuntu 16.04 Xenial Xerus

After a little trial and error here is a brief instruction on how to install Nixnote2 Beta 7 on Ubuntu 16.04 Xenial Xerus. NixNote is not in software repositories for Ubuntu. You can however download it from the Sourceforge page. This is a workaround until a patch is released. There is a bug filed for this already.

I tried installing Nixnote 2 beta 7 on Ubuntu 16.04 using the Deb package and that didn’t seem to work. I also tried to download the tar.gz file and run the install via the install.sh script and that didn’t work either.But, by luck, I found that doing both actually seems to work.

Go to https://sourceforge.net/projects/nevernote/files/NixNote2%20-%20Beta%207/ and download both the tar.gz and the deb file for the relevant architecture you’re trying to install.

Download them to your downloads folder. Change directories to the download folder.

Run the following first, which will install the dependencies.

This will error.

Then run the following in the terminal:

The -f fixes the broken dependencies. This is what it says on the man page for apt-get about the -f switch.

At this stage, nixnote2 still doesn’t run. This is where the tar.gz file comes in handy.

Extract the zipped file.

Change directory to nixnote2

Run the install script.

Press Alt + F2 and type nixnote2 and then press enter.

Then it should open.

Links:

https://sourceforge.net/projects/nevernote/files/NixNote2%20-%20Beta%207/
http://linux.die.net/man/8/apt-get
http://www.omgubuntu.co.uk/2016/04/ubuntu-16-04-deb-software-install-error
http://tutorialforlinux.com/2016/05/16/how-to-install-nixnote-2-on-ubuntu-16-04-xenial-32-64bit-linuxgnu/
https://sourceforge.net/p/nevernote/bugs/251/

Writing CMTrace format Log files with Powershell

Anyone who has administered a little SCCM in their time, would be be familiar with the tool CMTrace or SMSTrace. CMTrace is a tool that comes with System Center Configuration Manager. It allows you to view the myriad of logs files that SCCM generates in a consistent and easy to read format. Being used to the log format that CMTrace generates, I thought it would be a great idea to use that format for logging Powershell script actions and errors.

I hunted around the web and found a few versions of a log function using CMTRace. The best implementation that I found was from Russ Slaten at the System Center Blog site. It works really well but I wanted to add some different functionality.

CMTrace.exe is part of the System Center 2012 R2 Configuration Manager Toolkit, which I believe anyone can download. If you have System Center Configuration Manager installed in your environment, you can also grab it from the \\”SiteServer”\Program Files\Microsoft Configuration Manager\tools\cmtrace.exe.

There are a few different use cases for when logging is handy: -

  • Running Powershell scripts as Scheduled Tasks.
  • Auditing automation centrally in a team environment.
  • The output of a log could be used as part of change management processes.
  • Debugging locally and remotely

I’ll start off by posting the script. Below I’ll go into some information that might help in using the script.

**NOTE: This has only been tested on Powershell v5.0. The information stream is a new feature of Powershell v5.0.**

Here is the script: -

I’ve included a help file inline to help with calling the function.

Where does the log file get created?

The function by default will log to $Env:temp\powershell-cmtrace.log. You can however pass a file location to the function if you would like to the log file in a different location.

What does the output look like on the host?

Here is an example.

Why does Error only log one line back to the host, where is all the ErrorRecord informaiton?

I wanted to write back to the host in a consistent fashion. The error record is still there I’m just not passing it back to the host. The full error record gets put in the log file and you can view that information by clicking on the Error entry and looking at the window down the bottom of CMTrace. Also, you can still access the error information in the host by using the $Error variable. If it were the last error you would access it by using the first index of the $Error variable. eg. $Error[0].

What does the output to the log file look like?

It looks like this. Notice the Error information is in the box down the bottom.

I don’t want to see the output on the host, I just want it to log in the CMTrace format.

There is a parameter switch called WriteBackToHost. By default it’s set to True, but if you don’t want to see the output then set this to false.

How do I call this function?

To call this function, either dot source it, run it from ISE and then call it, put it in your profile or pop it in a module and Bob is your uncle.

Gimme some examples of how to use the Write-CMTracelog function.

Here are some examples of how you would use this advanced function that are in the help section of the function.

Examples:

The below example shows how to output a verbose message.

This example shows how to use the Preference variables with the Write-CMTracelog function. It should obey any preference variables that are set in the same scope from where the function has been called.

This example shows how to use the function with a terminating error by using the $Error variable in the message parameter.


Hope this function helps you out. Feel free to use and modify to suit your needs.

Sources:

http://blogs.msdn.com/b/rslaten/archive/2014/07/28/logging-in-cmtrace-format-from-powershell.aspx
https://www.microsoft.com/en-us/download/details.aspx?id=50012
http://blogs.technet.com/b/heyscriptingguy/archive/2015/07/04/weekend-scripter-welcome-to-the-powershell-information-stream.aspx

Connecting Word 2016 to WordPress - Step by Step Guide

Connecting Word 2016 to a WordPress Blog is suprisingly easy. It allows you to create your blogpost in Word, insert your pictures etc and then press the publish button and your post will published with all of your images uploaded to your blog site. It's a pretty handy feature if you prefer to use Word for blogging as opposed to something like Windows Live Writer or the updated open sourced version called Open Live Writer.

Below is a step by step guide of how I connected Word 2016 to my WordPress Blog.


Start by opening Word 2016, and clicking on the Blog Post template.

You will then be greeted with the Register a Blog Account wizard. Select Register Now.

Select WordPress and then click Next.

Populate the Blog Post URL with your blog URL. Make sure to leave the xmlrpc.php appended to the end of your URL. By default XML-RPC functionality is turned on by default since WordPress 3.5. In earlier version the user needed to turn it on in the blog settings.

Fill out your Username and Password and then select Picture Options.

Select the Picture Provider that is relevant for your site. For my site I'll pick My Blog Provider.

Click Yes. (Maybe not such a good idea if you are on public wifi, because if someone is sniffing packets they will get they username and password you are using to authenticate. Here is a link to an article about using Https and SSL To connect to WordPress)


Click OK.

Now that it's all connected. Submit a test post to check if everything is working OK.
Note: You can even set the category of the post by selecting Insert Category. A drop down list of all the categories you have specified on your blog will be shown.

Once you would like to send the post to your blog select Publish as Draft. Otherwise, your article will be posted.

If everything goes smoothly, you should get a confirmation that the post was published.

Log into your blog and you should see the post you have created.

That's all there is to it. Hope this helps.


Getting the Definition of a ScriptProperty in Powershell

Sometimes when you are checking an objects members you will come across the membertype ScriptProperty. I recently ran across this when I was troubleshooting some issues I was having with the Get-Hotfix cmdlet. When you pipe Get-Hotfix to Get-Member you can see that the property InstalledOn has the membertype ScriptProperty. I wanted to know what was actually going on in that definition but as you can see from the screen shot below it's truncated.

I did a bit of reading and it turns out you can get that information by running the following set of commands.

This will then print out the definition of the ScriptProperty.

The other way to view this would be to crack open the types.ps1xml and search for the bit you can see as this is where the scriptproperty is set. I used Notepad ++ to make it easier to find.

Powershell 5.0 with Chocolatey Sauce = Delicious!

Since the release of Windows 10 I have spent some time playing with the Production Preview of Powershell v5.0. The new PackageManagement module is a great addition to this version of Powershell as it allows you to install software from the Chocolatey resource. Documentation and examples is a bit scarce at the moment but I found some cmdlets have some online help files.

Here is what I’ve found so far: -

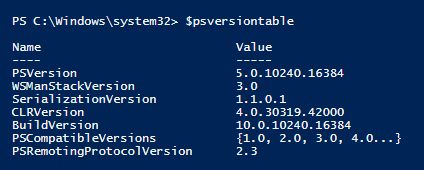
I’ll start by making sure I’m on Powershell 5.0.

$psversiontable run in powershell

Figure 1

Let’s check what cmdlets the new PackageManagement module offers us.

Using Get-Command with the Module property to get the list of cmdlets in the PackageManagment module.

Figure 2

Get-PackageSource gets a list of package sources that are registered. Here is the online help for this cmdlet.

Get-PackageSource cmdlet example

Figure 3

Only the PSGallery source is available. The Powershell Gallery is a great resource in itself. Making it really easy to find useful modules in a central location. That’s a topic for another day however. Here is the link if you’d like to check out what the Powershell Gallery has on offer.

The other cmdlet that interested me was the Get-PackageProvider cmdlet. The Get-PackageProvider returns a list of package providers that are connected to PackageManagement. Out of the box in the preview you get Msi, Msu, Programs and PSModule. I wasn’t entirely sure what was the difference but the About_Oneget online help file helped out here. The package provider is the package manager and the package source is the location the package provider connects too.

An example of running the Get-PackageProvider cmdlet.

Figure 4

Let’s try and add Chocolatey as a package provider. The force and forcebootstrap parameters can be used interchangably according to the online help file for the Get-PackageProvider cmdlet.


An example of using the Get-PackageProvider to add the PackageProvider Chocolatey.

Figure 5

Now we have a Chocolatey package provider and if we use the Get-PackageProvider cmdlet again we can see it’s been added.

Now the Chocolatey Provider is added.

Figure 6

When I run the Get-PackageSource cmdlet again I can also see that there is a Chocolatey package source as well.

The Chocolatey PackageSource has been added.

Figure 7

In Figure 7, you can see the Location has been truncated so I can see the actual location better by piping to the Format-List cmdlet. Notice in Figure 8 the “IsTrusted : False” property. What does that mean? IsTrusted:False sounds bad. Below is an excerpt from the Chocolatey site about whether you should trust the Chocolatey package source. If you really wanted to be safe you would set up your own repository internally and then add tested software to that repository. Kind of like you would already do with SCCM or another application deployment system.

How do I know if I can trust the community feed (the packages on this site?) Until we have package moderation in place, the answer is that you can’t trust the packages here. If you require trust (e.g. most organizations require this), you should have an internal feed with vetted packages using internal resources. You should always decide whether you trust the maintainer(s) of the package, and even then you may want to inspect the package prior to installing. You can inspect packages easily with nuget package explorer or by clicking download on the package page (and then treating the nupkg as a zip archive).

From <https://chocolatey.org/about>


Using the Format-List cmdlet to better see the values of the properties.

Figure 8

Now we have added the Chocolatey package provider and the Chocolatey package source, let’s see what we can do with the Find-Package cmdlet. Let’s look for Notepad++.

Using the Find-Package cmdlet to find Notepad++

Figure 9

Cool, it finds it. But what if you didn’t know really what Notepad++ was. Let’s see what the summary property says about Notepad++.

An example of using Select-Object to find more information about the Package.

Figure 10

Because the Chocolatey package provider isn’t trusted. Let’s save the package to our local hard drive. First I have to create the location that I’d like to save the package too.

Using the Test-Path cmdlet to test the location and the New-Item cmdlet to create it if it doens't exist.

Figure 11

Now that the location has been created let’s use the Save-Package cmdlet to save it to the location. I’ll use the -IncludeDependencies parameter to make sure I get all the bits I need to install Notepad++.

Using the Save-Package cmdlet to save the package locally so that you can have a look at it's files.

Figure 12

Let’s check what files we have in our saved location. In Figure 13 we can see that there are 2 files with .nupkg extensions. I wasn’t sure what sort of file .nupkg extension was. I’ve heard of Nuget but I’ve never really used it. Turns out you can extract the contents of a .nupkg file just like a zip file. Excellent, I know that the Production Preview of Powershell 5.0 that shipped with Windows 10 has an Expand-Archive cmdlet.

An example of using the Get-Childitem cmdlet.

Figure 13

In Figure 14, you can see I’ve tried to use the Expand-Archive cmdlet to extract the contents of the .nupkg file but the red text tells me that only the .zip file extension is supported. Oh well, it was worth a shot. You can also see in Figure 14 the use of the PipelineVariable parameter. This is the first time I’ve used that parameter and it allows me to store the current pipeline object into the variable I’d like to use. You can read about it more over on Keith Hill’s blog.

An example of trying to use the Expand-Archive cmdlet. Also an example of using the -PipelineVariable parameter.

Figure 14

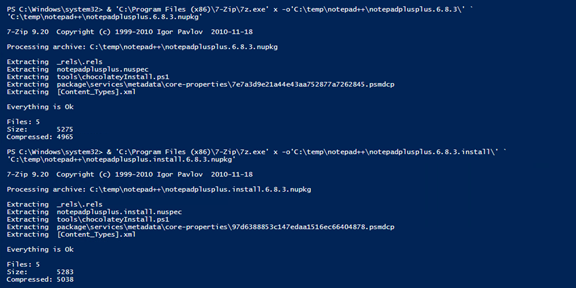
So, I can’t extract using the built in Expand-Archive cmdlet but I still have my trusty 7zip executable. In Figure 15 you can see an example of calling 7z.exe from within a powershell console. It works like a charm.

An example of using 7z.exe from within Powershell.

Figure 15

Now that we have extracted the contents I can see a couple of files but nothing really sticks out except the .ps1 files. I can use the Get-Content (or Cat alias) to print the contents of the file to the Powershell Console.

An example of using the Get-Content cmdlet.

Figure 16

So we can see that all the ps1 file is doing is downloading the Notepad++ installer from the Notepad++ website. Sounds legit. If you were still a little bit suspect about the other files, and you didn’t have Real Time monitoring turned on, you can always scan the directory manually with Windows Defender from the Powershell Console like I have done in Figure 17.

An example of using Windows Defender to scan files manually from Powershell. I believe this would work with System Center Endpoint Protection as well.

Figure 17

After going off into the weeds a little, I’ll now just get on with using the Install-Package cmdlet to finally install Notepad++. After playing with this module I now am excited to use these cmdlets to script installing all the software I normally use. That’s for another day however. Hope this helped.

An example of using the Install-Package cmdlet.

Figure 18

Image Source: https://upload.wikimedia.org/wikipedia/commons/thumb/f/f2/Chocolate.jpg/308px-Chocolate.jpg

SCCM 2012 R2 – MDT 2013 UEFI OS Deployment Error

I recently upgraded to SCCM 2012 R2 and also upgraded to MDT 2013 to take full advantage of its OS deployment goodies. Everything has been going well until I decided I’d like to deploy an OS to a 2nd Generation Hyper-V Virtual Machine. I started getting all sorts of different errors. It really started driving me insane. A lot of four letter words were used. For that I am sorry. Good news is, I got it working in the end.

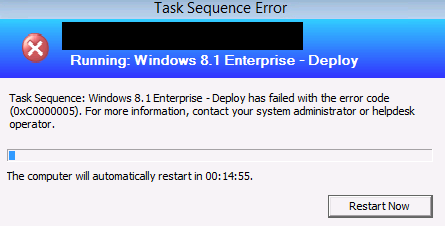
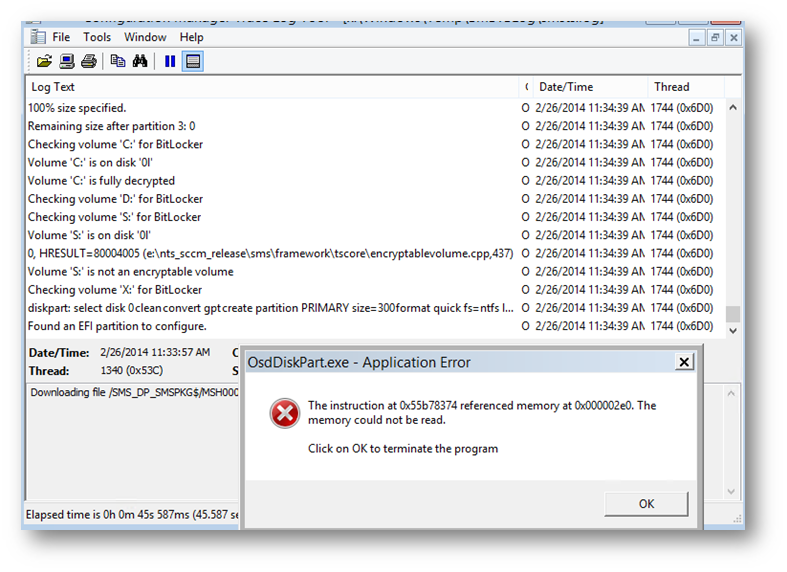
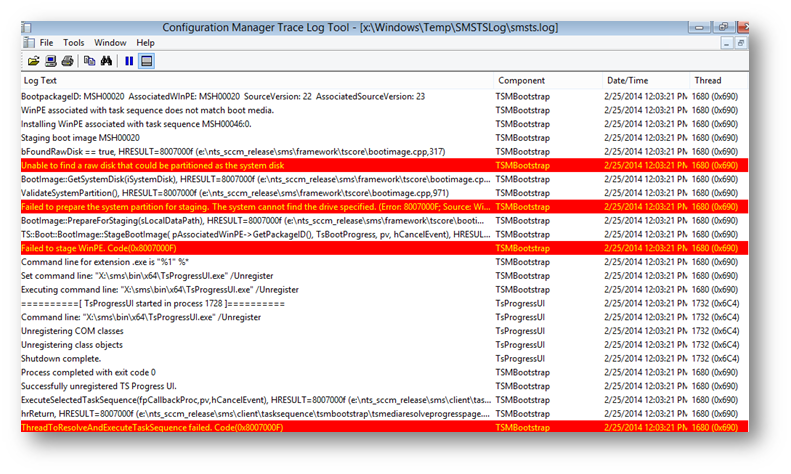
Here are some of the errors that I was receiving. Sometimes it would error before it pre staged the WINPE image, sometimes after. Sometimes after a reboot.

I received a (0xC00000005) error.


A generic memory error.


An “Unable to find a raw disk that could be partitioned as the system disk” error that resulted in a (0x8007000F) error.


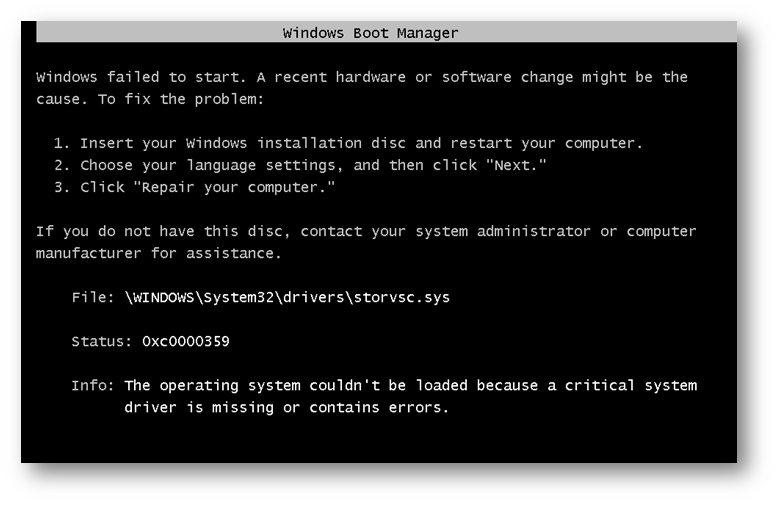
And the weirdest one I got, was after the partitions and disk had been setup and SCCM rebooted, it came up with a 0xc0000359 error saying the storvsc.sys was missing.


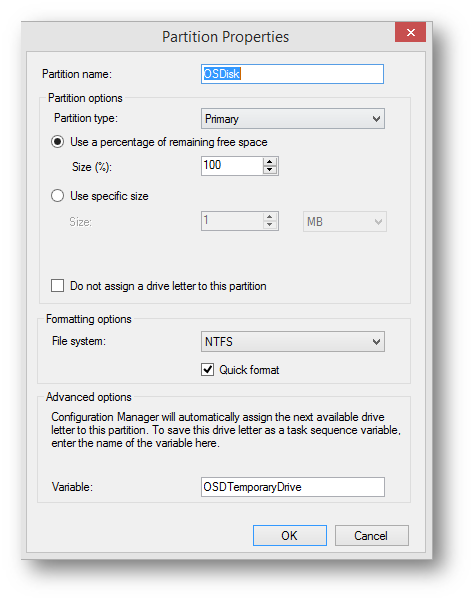
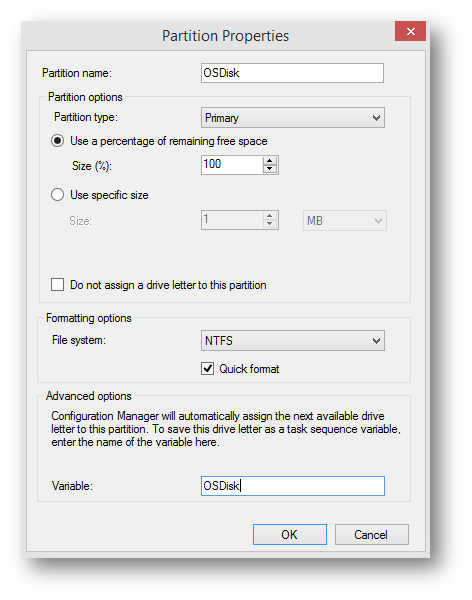
By this time I’d be round and round and round in circles. It’s then I found a blog post that showed me to change the Partition Variable for the OSDisk from OSDTemporaryDrive to OSDisk. This is apparently set by default to OSDTemporaryDrive in MDT 2013. Seems like a bit of a fail to me L Could I please have a day and half of my life back please Microsoft. That is all.

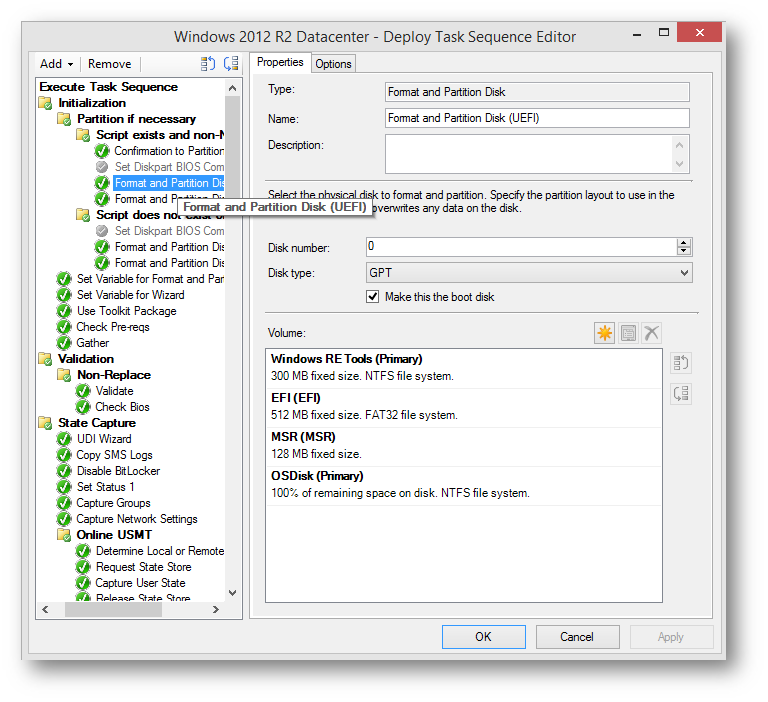
In the task sequence, look in the Initialization folder for the 4 different format and partition steps.

If you look at the OSDisk partition, you’ll find that its variable is set to OSDTemporary Drive.


Change this to OSDisk.

That’s all you need to do.


Upload Word Document or HTML to SharePoint Wiki Workaround

Copying a word document or HTML to a SharePoint Wiki that contains articles can be a long manual process in SharePoint 2010. I’ve tried many different techniques and looked at many different articles to try to achieve this. This is the only “free” work around I can find. I hope it helps you.

This process outlines how to create a Personal SharePoint Blog and also how to then copy SharePoint Blog entries into the SharePoint Wiki. This solves the time consuming problem of having to upload images to the SharePoint Wiki manually if you would like to do a Wiki post. Not only that, but it also gives you your own personal SharePoint Blog page that can be used to post your own articles to the rest of your Team.
 

Creating your personal SharePoint Blog page


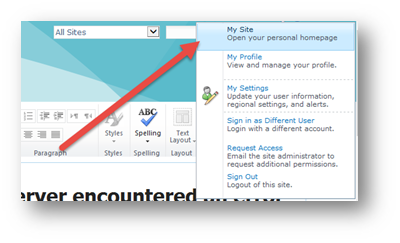
Navigate to your personal SharePoint page. You can do this by logging into our normal SharePoint Team page, then click on your username in the top right of the screen and select My Site.

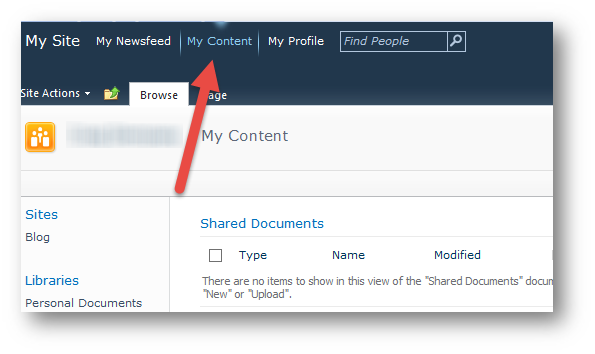
Click on the My Content tab.

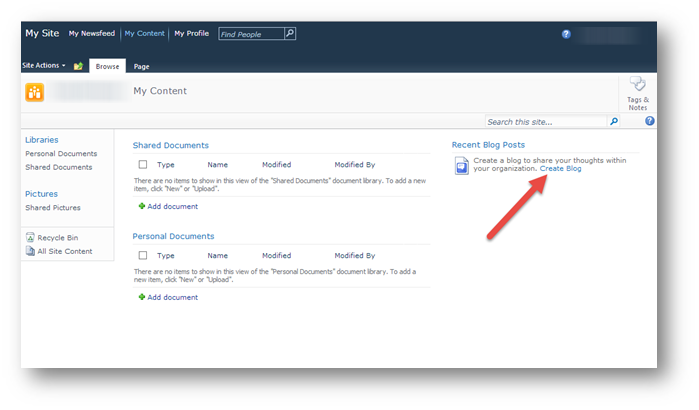
Then click on Create Blog.

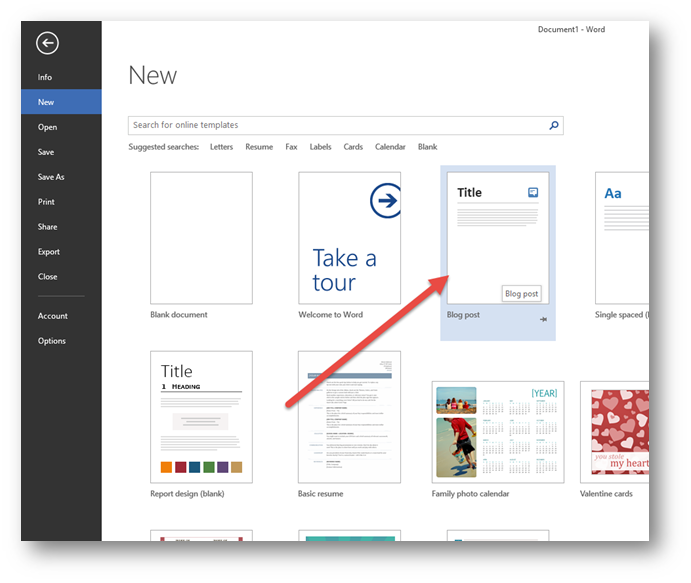
Open up word and select New, then select Blog post.

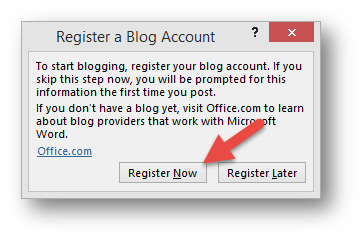
Select Register Now.

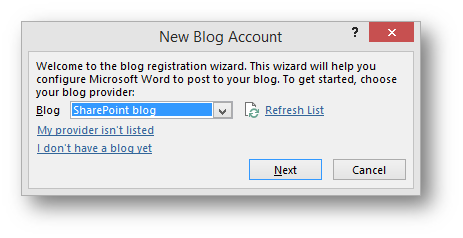
Select SharePoint Blog.

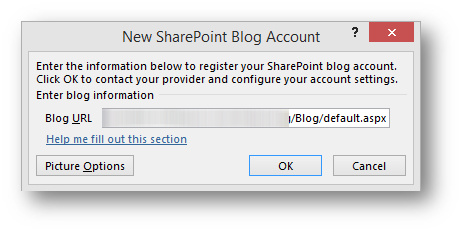
Copy and paste your blog URL into the Blog URL field.

Click Yes and check the Don’t show this message again checkbox.

It will then contact the SharePoint Blog.

Click OK to acknowledge the successful account registration.

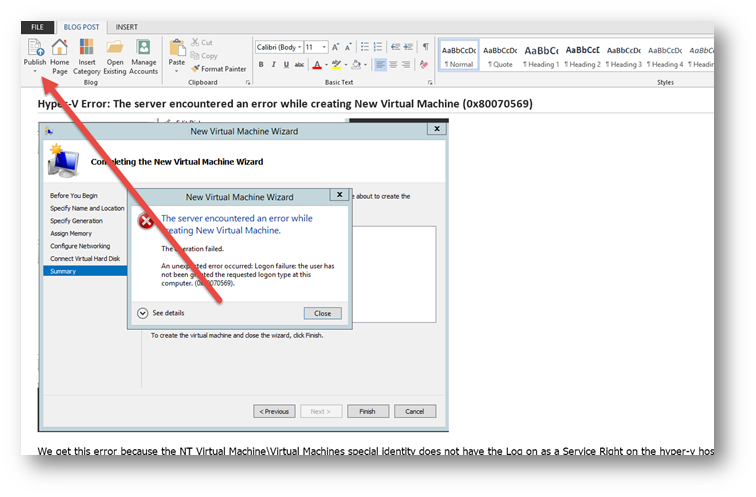
Create your blog post. Then click Publish.

Refresh your blog and you should see your post. From here you can create Categories for you posts or manage your posts etc.

Creating the SharePoint Wiki entry from the Blog post

To make a SharePoint Wiki Entry off the blog post do the following.

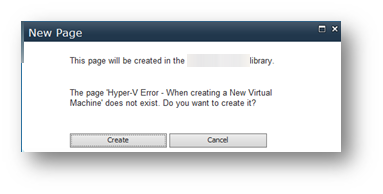
Create the page for your Wiki Entry.

Once the page is created, you can paste the body of your Blog article on the wiki page.

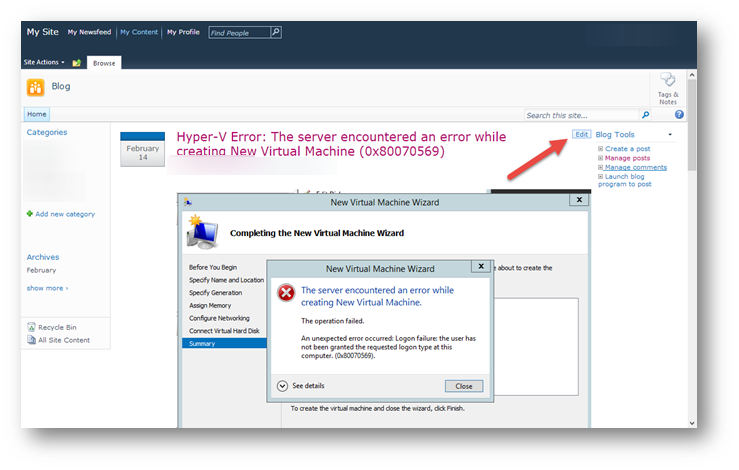
Go back to your blog post you created earlier and then click the Edit button.

With your mouse, select and copy the entire contents of the body so that it is all highlighted.

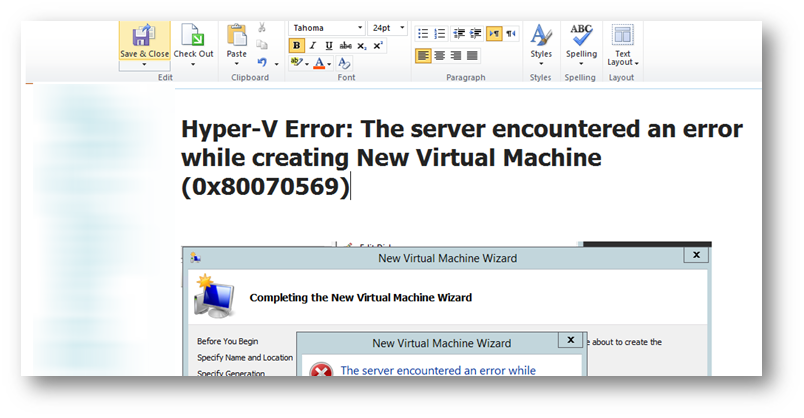
Paste this into your new Wiki page. Copy the title over as well. Check for formatting and then click Save & Close.


Backing up Active Directory in Windows Server 2012 R2 with Powershell

Backing up Active Directory in Windows Server 2012 R2 with Powershell is now really easy thanks to the Windows Server Backup cmdlets provided in Powershell. Windows Server Backup allows you to create a Scheduled backup or a one time backup. In this example, I’ll be doing a one time backup but scheduling via a scheduled task to allow for more flexibility and I’ll be backing up the system state of the server.
The first thing that you will need to do if you haven’t done so already is to install the Windows Server Backup feature.

Once that is done, below is a little script that I created for myself that will backup a server’s system state. If this is a domain controller, you could use the system state backup to restore Active Directory if needed.
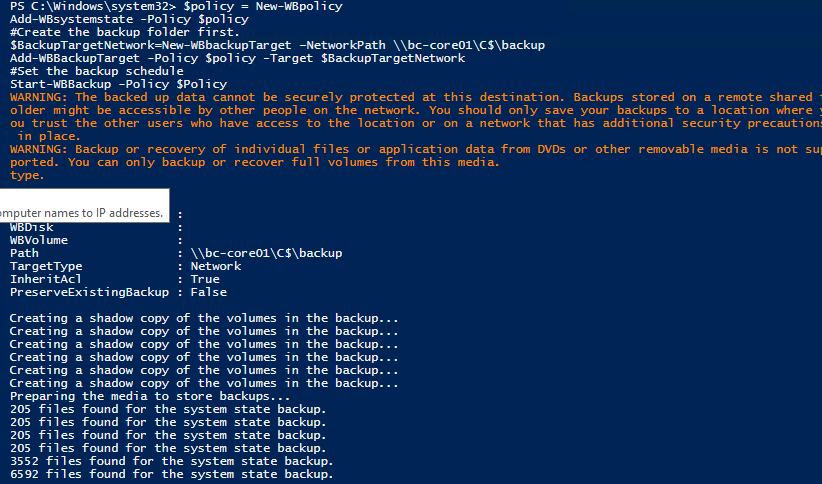
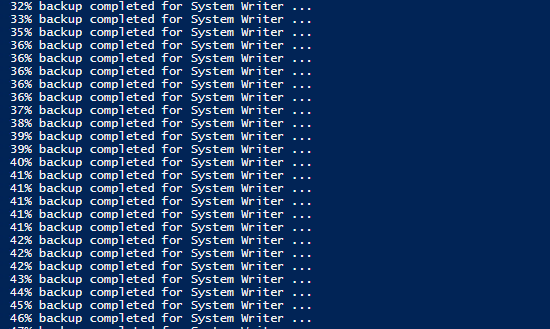
Here are some screen caps of what it looks like when it is running.

To finish things off, you can then create a scheduled task to run the script at a time you would like.

I’ve already created a post to show how to create a scheduled task using Powershell. You can find that here.

For further information or to checkout the material I used to create this script please click on the following links: -

Windows Server Backup Cmdlets in Windows Powershell
http://technet.microsoft.com/en-us/library/jj902428.aspx
Using Windows Server Backup Cmdlets
http://technet.microsoft.com/en-us/library/dd759156.aspx
Windows Server Backup Step by Step Guide for Windows Server 2008 R2
http://technet.microsoft.com/en-us/library/ee849849(WS.10).aspx